How to secure Logic Apps in Azure?
By Anshul
- 6 minutes read - 1089 wordsIf you are new to Logic Apps, keep reading. If you have deployed such workflows before, you may skip to the next section..
What is Logic App?
Logic Apps in Azure provide a cloud-based platform to design and run workflows that can span from the boundaries of your Azure infrastructure to external systems accessible via Internet and even to your On-premise applications. To give a brief introduction about the service, Logic Apps have 3 basic artifacts which are important to be understood before getting your hands dirty with this amazing service from Microsoft.
- Trigger - This is the first step/action that you add to a logic app by defining the conditions on which Azure will trigger an instance of the Logic App. The trigger can be a time-based or specific service based action. Running a Logic App when a new email is received in your Inbox is an example of a trigger.
- Action - The steps that follow the trigger are known as actions. Logic App provides numerous in-built actions for plethora of services. Sending an email using your Office 365 credentials is an example of an action.
- Connectors - Microsoft provides a huge list of connectors for various SaaS services, applications, or systems. These connections are nothing but a wrapper or a pre-built proxy around a REST API defined to connect to a specific service. Microsoft manages the Managed Connectors but the platform also allows you to create your own customized connectors. To send an email in the previous example, you would have to use the built-in Office 365 connector in the workflow and then choose an action like sending an email.
Ok. So with this now, we know what Logic App is all about. Now let’s see how we can secure the workflow from unauthorized access.
Ways to secure Logic Apps
1. Access Control (IAM):
This method helps to protect the Logic App workflow from any unauthorized administrative changes. You can assign appropriate permissions to the developers in your organization who would be responsible for managing the Logic Apps. There are two resource-specific roles available in Azure portal which you can assign - Logic App Contributor and Logic App Operator. Former can do everything on a resource, except managing the access to it while latter can only read the instance details and connections. You can also create custom roles to specify specific permissions that you may require to include or exclude from the bunch you get from these two roles. But this control can help you manage access on the management plane only. Let’s see other ways where we can control the access to the endpoints too.
2. Shared Access Signatures (SAS):
This method applies to the workflows that have a HTTP request as a trigger. For these workflows, Azure provides the URL of the endpoint once you save the workflow. The endpoint looks something like this -
https://prod-05.centralindia.logic.azure.com:443/workflows/6642c4b3d70a46aa8d1397f29eebb8c9/triggers/manual/paths/invoke?api-version=2016-10-01&sp=%2Ftriggers%2Fmanual%2Frun&sv=1.0&sig=XJu47j12MjwMAvvXYgvEYaPN27SV0gb694SDqkzCx34
The highlighted part in the endpoint is the signature (after ‘sig=’) which is appended with the URL by Azure and that is why you do not have to perform any authentication while sending the requests. But in case, this URL is mishandled or exposed on public platforms, you may get tons of requests from someone trying to overload the system. A quick way to make sure that you avoid such scenarios is to keep changing this signature. You can do this from Logic App blade, under settings –> Access Keys.
Go to the Access keys and regenerate the primary key. This will change the signature that is appended to the URL and then you can share the new endpoint with the dependent systems.
Note- It could be tedious to keep regenerating the keys and we have more advanced ways to control the access to this endpoint. But for the sake of listing all the ways, this has been included.
3. IP restrictions:
This method is the major player in terms of securing your Logic App workflows. It gives you capabilities to limit the client devices/applications to call your Logic App. This setting can be configured from Workflow settings under Settings.
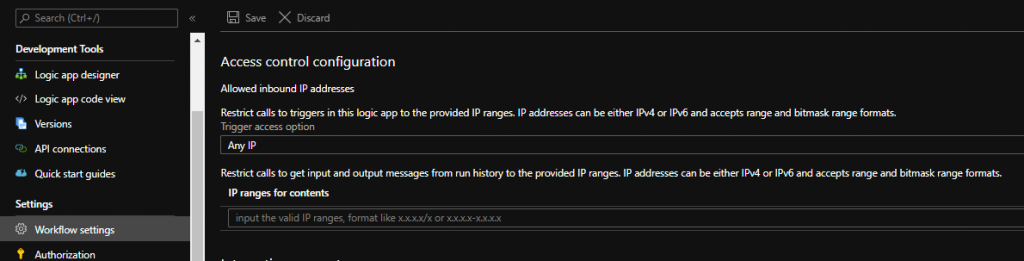
Restrict calls to triggers in this logic app to the provided IP ranges- This is where you can define the IP addresses or ranges from where you expect to receive requests. It gives you three options- Any IP, Specific IP ranges and Only other Logic Apps. The last options lets you define the connection to another Logic App where you are running this workflow as nested logic app. Using this setting you can make sure that only those services access your logic apps which are actually supposed to.
Another important setting is to restrict the API access to workflow’s inputs and outputs during its previous runs. Here you can define the IP ranges too from where those API calls would be allowed.
4. API Management:
Exposing your logic app endpoints without any gateway in between could be risking your applications’ safety. So a way around that issue is to use API management instance as a gateway to all your Logic App requests and also applying other security features on top of it like User authorization, requests throttling and customized URL.
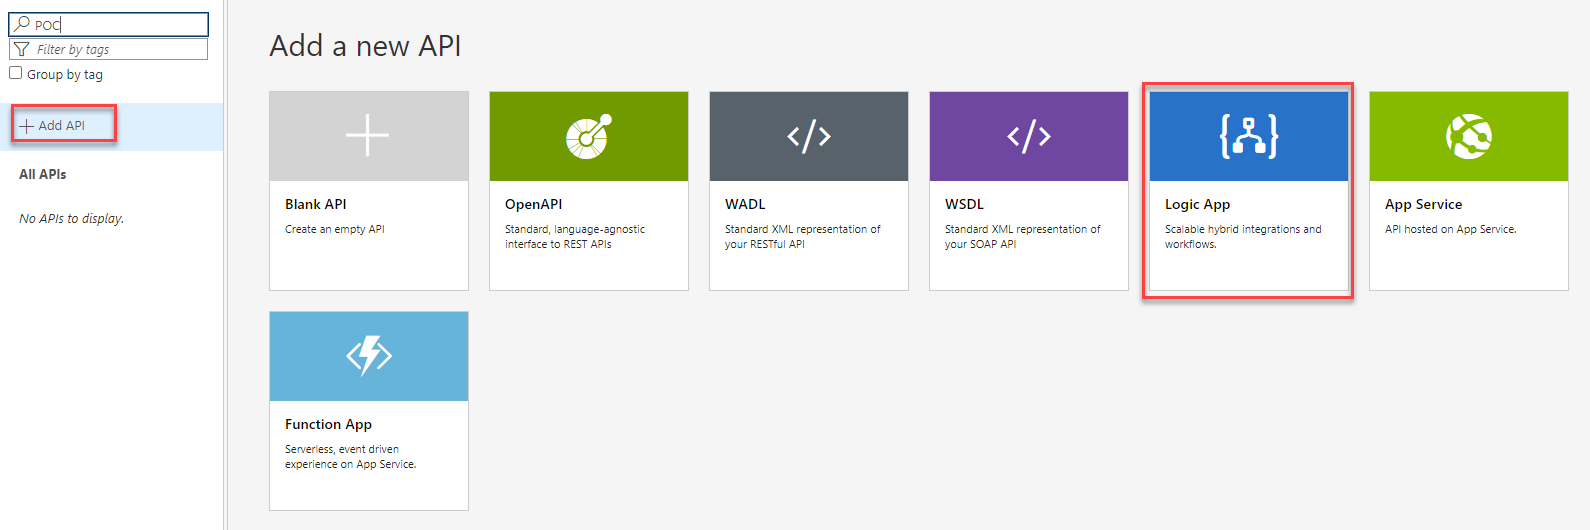
So what happens here is, you create your API management instance, add your Logic App as API and then configure the settings according to your needs. From that point onwards, your systems would need to call the API management endpoint instead of directly calling the Logic App. You can apply multiple policies on both your incoming as well as outgoing requests. On top of all this, you can combine this method and #3 by specifying the IP address ONLY in the IP restriction setting of the Logic App so that Logic App does not receive any requests from anywhere else.
Another awesome advantage to this solution is, you can make use of Revisions feature which lets you test your new workflows as well with a minor change in the URL. Moreover you can expose multiple Logic Apps via single API!
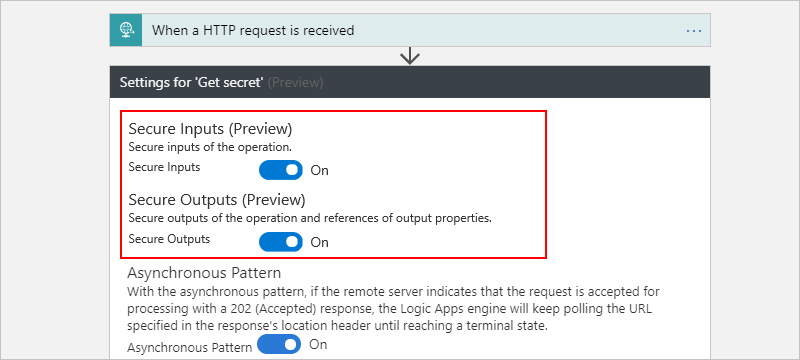
5. Input and Output Obfuscation:
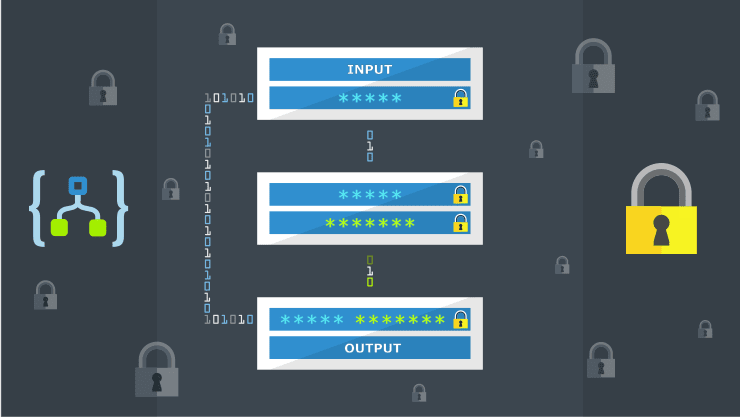
This setting allows you to hide sensitive data from your workflow actions. All you need to do is go to the settings of your action like in the example below and toggle the options to secure the inputs and outputs of this action
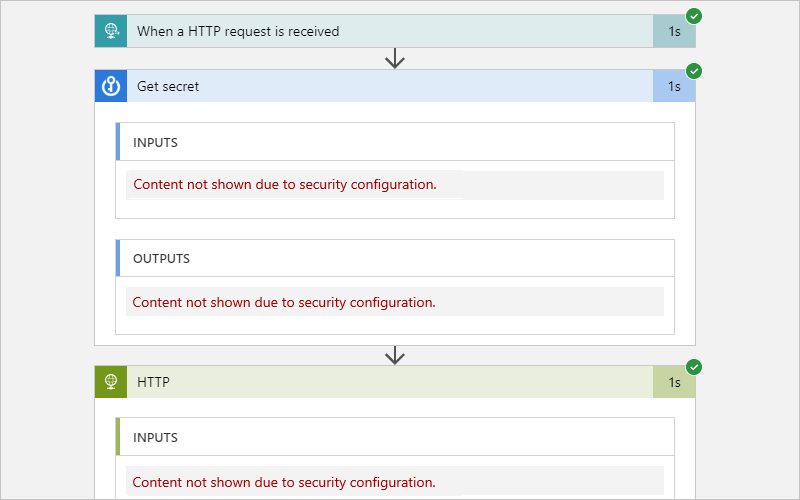
After the logic app runs, you can view the run history and open the latest run to see the actions. You will see something like this-
So that was it. Do let me know if you found this helpful. Cheers!